Wednesday, December 31, 2014

Ooh la la! DIY Gold Chandelier


Ever see all those fancy decorations and then when trying to find it, you can never find what you are looking for?  Ya, that's me...always...I have these insane ideas for DIY projects and decorations and sometimes the ambition to complete them.  Luckily, I have a crazy enough family that is willing to humor me and be ambitious with me!

So this is where the golden chandelier was created, inspired by the Great Gatsby for a Roaring 20's themed party.  When trying to find one to buy, they were all too small and would get lost in the size of the room so we created two! 

What you need (this will make 2): 
  • 1- 12' fringe curtain such as this one or you can use 2-fringe table skirts (just make sure the length is what you are looking for as well as long enough to cover your hula hoop!)
  • 2 hula hoops (the size you would like your chandeliers to be)
  • spray paint similar to the color of your fringe curtain 
  • packing tape/masking tape
  • thin string/fishing line
  • hot glue gun
  • scissors
  • a large area to lay out the curtain on
  • 2 people! This will definitely make this a lot easier

  1. Spray paint your hula hoops. You only need to spray paint the side that is facing down, but can do both sides if you'd prefer.  
  2. If you are using table skirts, skip to step 6.  Lay out the curtain on the floor. You will want it as flat as possible with as few strands overlapping as possible.  This will make the next step easier. 
  3. Using your second person, pull a piece of packing tape that is the width of your curtain (12 feet) and half way down the length of the curtain (4 feet).  The metallic fringe was full of static so we placed the tape down on both sides at the same time, then pushed the fringe to the tape.
  4. Next, cut along the TOP part of the taped area along the width of the curtain (12 feet).  You have now made 2 long strips of fringed curtain that are 4 feet long.  
  5. Flip the curtain over and put another strip in the same spot as the tape on the other side.  
  6. Take one strip and hot glue it to the hula hoop. Hot glue small amounts at a time so the glue doesn't dry before you are able to get the curtain attached.  Be careful, it gets hot!!!
  7. Once your hula hoop has fringe all around, cut the excess off.
  8. Repeat steps 6 & 7 for your second hula hoop.  
  9. Attach 3 pieces of string to the hula hoop and loop together.  Hang using string or fishing line.  I hung this on a fan, but you can hang from anywhere on a ceiling.  Command hooks work great! 
  10. Trim any crooked fringe or if it is hanging too low.  
  11. Voila! You have yourself two chandeliers!
Additional Thoughts: If you have the time, you can also make a second smaller hula hoop fringe to hang underneath it to add depth.  We ran out of time, but it could have been a nice touch.  

Here is a picture tutorial to help with these directions! Good luck! :) 

1. Spray paint your hula hoops. You only need to spray paint the side that is facing down, but can do both sides if you'd prefer.  


2.  If you are using table skirts, skip to step 6.  Lay out the curtain on the floor. You will want it as flat as possible with as few strands overlapping as possible.  This will make the next step easier.

3. Using your second person, pull a piece of packing tape that is the width of your curtain (12 feet) and half way down the length of the curtain (4 feet).  The metallic fringe was full of static so we placed the tape down on both sides at the same time, then pushed the fringe to the tape.


4. Next, cut along the TOP part of the taped area along the width of the curtain (12 feet).  You have now made 2 long strips of fringed curtain that are 4 feet long.  


5.  Flip the curtain over and put another strip in the same spot as the tape on the other side. 

 
6. Take one strip and hot glue it to the hula hoop, wrapping it around the top of the hula hoop. Hot glue small amounts at a time so the glue doesn't dry before you are able to get the curtain attached.  Be careful, it gets hot!!!

7. Once your hula hoop has fringe all around, cut the excess off.

8.  Repeat steps 6 & 7 for your second hula hoop.
9,  Attach 3 pieces of string to the hula hoop and loop together.  Hang using string or fishing line.  I hung this on a fan, but you can hang from anywhere on a ceiling.  Command hooks work great! 

10,  Trim any crooked fringe or if it is hanging too low.  


Voila! You have yourself two chandeliers!

Sunday, December 7, 2014

Roaring 20's Party Ideas and Decorations


Leaving the Roaring 20's Behind Party was a hit! We transformed a hall into an awesome Gatsby-inspired themed party.  Starting from scratch, we were able to create a complete look!

Before

After! With decorations from 1toystore.com and 4funparties.com, we were able to decorate the room really well! 


The chandeliers in the center of the room are made from gold fringe curtain and a hula hoop painted gold.  Here is the tutorial for the chandelier!


Here were some additional features of the party! I hope you are inspired from all these fun ideas!
A two tiered cake with fabric embellishments make for a fun, easy cake! 


Many of our favorite candies were invented in the 20s!! My sister put together this amazing candy bar with a timeline and descriptions of when the company started making the candies. It was a perfect Thank you goody bag! Who says goody bags are for kids?!?!
It was AWESOME! 

 Above the candy bar hung a Happy Birthday sign created using my Cricut. 

Centerpieces were made with spray painted branches (it was perfect that this party was in the winter!) and spray painted vases from the dollar store).  Hanging a string of pearls added the perfect touch to this centerpiece! 


I also made a photo booth using the program Sparkbooth ($55) that I had purchased when planning my husbands party last year. Last time, we made the space too small so the pictures were EXTREMELY dark.  This year, my party planner assistant (aka my mom) came up with the idea to use the frame from a canopy tent.  It was a 10' frame that we taped black table cloths to to create the photobooth effect.  (I ran out of black tablecloths - since I used some for the backdrop as well.  You will need 2 for each side if you are going to cover all sides.  

Photo props included mustaches, glasses, lips, boas, hats, saxophones, microphones and cigarettes.  We had a blast! 
I set up the photobooth to automatically print and it came out with 2 copies of the picture per page.  They were able to tape one into a book, giving me a keepsake of my 30th and the others was there to keep! 


Wednesday, November 19, 2014

30th Birthday Party - Leaving the Roaring 20s Behind Theme - Invitations

My family is really big into throwing everyone in our family a surprise 30th birthday.  Well I'm the last of 4 girls, so I knew the surprise would be coming and asked if I could crash the party planning.  We came up with the theme "Leaving the Roaring 20s Behind", which I am so excited to dress up for! My family LOVES to party plan and I think we do a pretty damn good job! You can be the judge ;-)

Here are some of my beginning thoughts once you come up with your theme.

Pick a date and location
Finding a location can be super tricky..How much work do you want to put into planning? Do you want a caterer/wait staff available or do you want a hall and you do the work/provide the food/drinks/etc?  Do you want to rent a mansion?

I went back and forth with this. Yes, having a place that caters and takes care of linens, plates, silverware, and everything is AWESOME! So much less work, but there are some things you have to consider: does the place fit your theme? Are you willing to sacrifice some decorating that you wanted if you can't decorate the walls, don't have the space, or both? As much as I wanted a mansion, there is no way I was justifying that cost to my husband!

I really wanted to make my own photobooth for this party (which I did last year for my husband's 30th, so I think I worked out the kinks!) and knew that I was going to be limited with decorating based on the places I found.  I also am having a party in the heart of holiday party season, which makes it way more difficult to find a place.

Soo...that's why we went with a blank slate! A rectangle hall with a bar.  All food and drinks will have to be provided by us, but I can decorate however I WANT!!! Woohoo!!! To get an idea of how crazy I am, I want to decorate the entire room..... I mean covering wall to wall. Think Great Gatsby!

You can essentially turn any space in a theme-oriented space, it just takes some planning.  

Good thing my family loves me!! :-D


Invitations
Now I went through pinterest and etsy to find something I was interested in and found this:

http://www.pinterest.com/pin/435090013975007291/ 
I wanted to make my own invitations.  I used Microsoft Publisher because it is easier for me to drag the text boxes around, but you can also use Word or some other word processor.

The following site was a fabulous resource for different paid and free fonts you can use:
http://www.blogher.com/throwing-1920s-great-gatsby-party-menu-book 

Using the different fonts, I created this invite:


I printed it on ivory paper. On the bottom is a qr code that I created; when scanned, it brought them to a google doc for responses that would automatically be uploaded to my computer.  If you scan the code on my invite, you will see that it brings you to the site that I used to create the code.

Many more 20s themed posts will be coming soon as decorations are created and ordered as well as how to put together your own photo booth!

Thanks for looking!

Tuesday, November 18, 2014

Crocheted projects!

Sorry guys!! I've been in hiding the past few weeks!  There were many birthdays and projects happening that needed to get accomplished, making me slack off! Some of the projects this week include an evil minion crocheted hat and bunny lovey! Both were used with combinations of patterns from others as well as my interpretation.


Next up, a crocheted Elsa doll & party planning for a Roaring 20's Party!! :)

Tuesday, October 14, 2014

Thanksgiving Turkey Burgers with Cranberry Sauce on Pretzel Rolls


Tastefully Simple came out with this Pretzel Roll Mix that I had to try.  Whenever we go out to eat, I always look for the burger or grilled chicken on a pretzel roll.  So instead of making these as just rolls, I wanted them to be big enough to be a bun for a delicious "Thanksgiving" turkey burger with a cranberry sauce!! Yumm!

The pretzel buns were easy to make with only two ingredients needed and easy-to-follow instructions on the box.


Cranberry "Aioli" Sauce

Next, I made my cranberry "aioli" sauce. You need: 
1/2 cup canned cranberry sauce (whole or jellied)
1/2 cup plain greek yogurt
1/2 tsp. apple cider or orange juice
Add all ingredients to food processor and blend.


Chill for 20 minutes or more.  Taste to see if you need to add any more cranberry sauce.  Once chilled, I tasted the greek yogurt more than when I first blended.  


Turkey Burger Recipe

You need (serves 4): 
1 lb. ground turkey
1/4 cup chopped onion
1 1/2 tsp. poultry seasoning

Mix together and separate into 4- 1/4 lb. patties.  Grill or steam, ensuring to cook all the way through. 


Layer your turkey burger and add your fixings.  Unfortunately we had no lettuce, otherwise that would have made it perfect!!! Add some sides, such as sweet potato fries (my favorite!!!) and broccoli (to add some veggies) and enjoy! 

Thoughts of the meal: LOVED the pretzel rolls! They were a huge hit. I made 5 buns out of the package, but I definitely made them too big. I should have flattened them more, making probably 8 buns instead...   The seasoned turkey burgers with the cranberry sauce were the perfect "Thanksgiving" combo.  Cranberry sauce on its own was a bit much, so it has to be a nice balance with other flavors.  Hubby enjoyed the dinner as well, which is an A in my book! :) 


Monday, October 13, 2014

Machine Embroidering on Crocheted Item: Success!


I bought a new sewing/embroidery machine two months ago and I haven't had too much time to play around with it.  My main thoughts behind getting the machine was to monogram towels.  In that process, I haven't found lettering that I really like for "S".  I think they all look like scribbles!

During the search for monogramming, my husband had this great idea to embroider on an ear warmer one of the races that we have completed.  So I ventured into crocheting an ear warmer for him that I was going to embroider "Gulf Beach 13.1" on, except, I made the headband too small.  It just fit me so perfectly though!! Perfect "mistake" right?! ;-)  That's when I decided to embroider "Roxbury 26.2" on it.  This marathon I completed last December in 15 degree, snowy weather.  It was such an awesome race that I signed up again!!! I want to make sure that I am nice and warm for this race and what better way than to show off the race name??

I've never embroidered on crochet and couldn't find much information about it so I treated it like it was a towel.  With towels, there is the concern that the needle will get caught on the material and pull, making it difficult to embroider.  That is when I found wonderful information on the web to use a water soluble stabilizer on top of the towel and a tear-away, or cut-away, stabilizer underneath.

I did the same thing with the crochet and it worked! Be careful not to pull your crochet too tight when putting it in the hoop, otherwise it will stretch and could pucker your work.

Happy crocheting and embroidering!! :)

Sunday, September 28, 2014

Chili in Whole Wheat Bread Bowls...Yumm!!!


Fall Fun!! Football Fun!! It's the season of warm stews, soups and chilis! My favorite! I've been trying to make healthier options for meals, but you'll see some not so healthy options in there (like buffalo wings!) Today my hubby's favorite football team was actually being televised so I made some homemade buffalo chicken wings and chili in whole wheat bread bowls! The chili in bread bowls were pretty healthy so that counteracts the wings right?!?!!  Either way....Soooo delicious!

Now on to the recipes! :)


Whole Wheat and Oat Bread
Makes 2 9"x5" loaves or 3-4 grapefruit sized bread bowls

What you need: 
  • 1/4 c. warm water
  • 3 tbs. unsweetened applesauce
  • 1- 4 oz. package active dry yeast
  • 1/4 c. molasses
  • 1/4 c. honey
  • 1 1/2 tbs lemon juice
  • 1/3 c. melted coconut oil
  • 2 eggs, beaten
  • 1/2 c. oats
  • 1/2 c. ground flaxseed
  • 3 1/2 - 4 c. whole wheat flour
  • 1/2 c. warm water
Mix 1/4 c. warm water, applesauce and yeast packet in large bowl.  Let sit until foamy and doubles in size, about 5 minutes.  Next, mix molasses, honey, lemon juice, coconut oil and eggs into yeast mixture.  Add oats, flaxseed and 3 1/2 cups flour.  Stir in 1/2 c. water and more flour as needed to make a dough. Need your dough until mixed thoroughly, but be careful not to overmix! 

Lightly oil a bowl, cover and let it rise in a warm place for about an hour.  It should almost double in size.  Punch down, knead with a little extra flour (if needed) and separate into loaves, or in my case, bread bowls! If making bread bowls, use lightly oiled glass bowls you have to bake the bread in (I use my Pampered Chef Glass Batter Bowl ). I kept my dough too round so it was more like a ball; you will want to flatten is slightly to have more of that "bowl" effect.  Let the dough rise one more time for about an hour. 

Mist dough with water and bake at 375 degrees for approximately 35-45 minutes.  


While your bread is rising the second time, you can put together your chili.  Here is my very simple but tasty recipe.  I usually season to taste so my spices are "guesstimates". 

Simple Chili

What you need:
  • 1 lb. ground turkey, browned
  • 2 cans stewed tomatoes
  • 1 can dark red kidney beans, drained and rinsed
  • 1 jalapeno pepper or banana peppers depending on what you want for spice, diced
  • 1 tsp garlic powder
  • 1 tbsp. chili powder
Brown ground turkey and drain, Add ground turkey, stewed tomatoes and kidney beans in a saucepan with diced jalapeno, garlic powder and chili powder to taste.  Simmer for at least 30-60 minutes.  


Bread Bowl Assembly

Cut open your bread bowls, pour in your chili, and top with some shredded cheese.  Enjoy! :)


Thursday, September 25, 2014

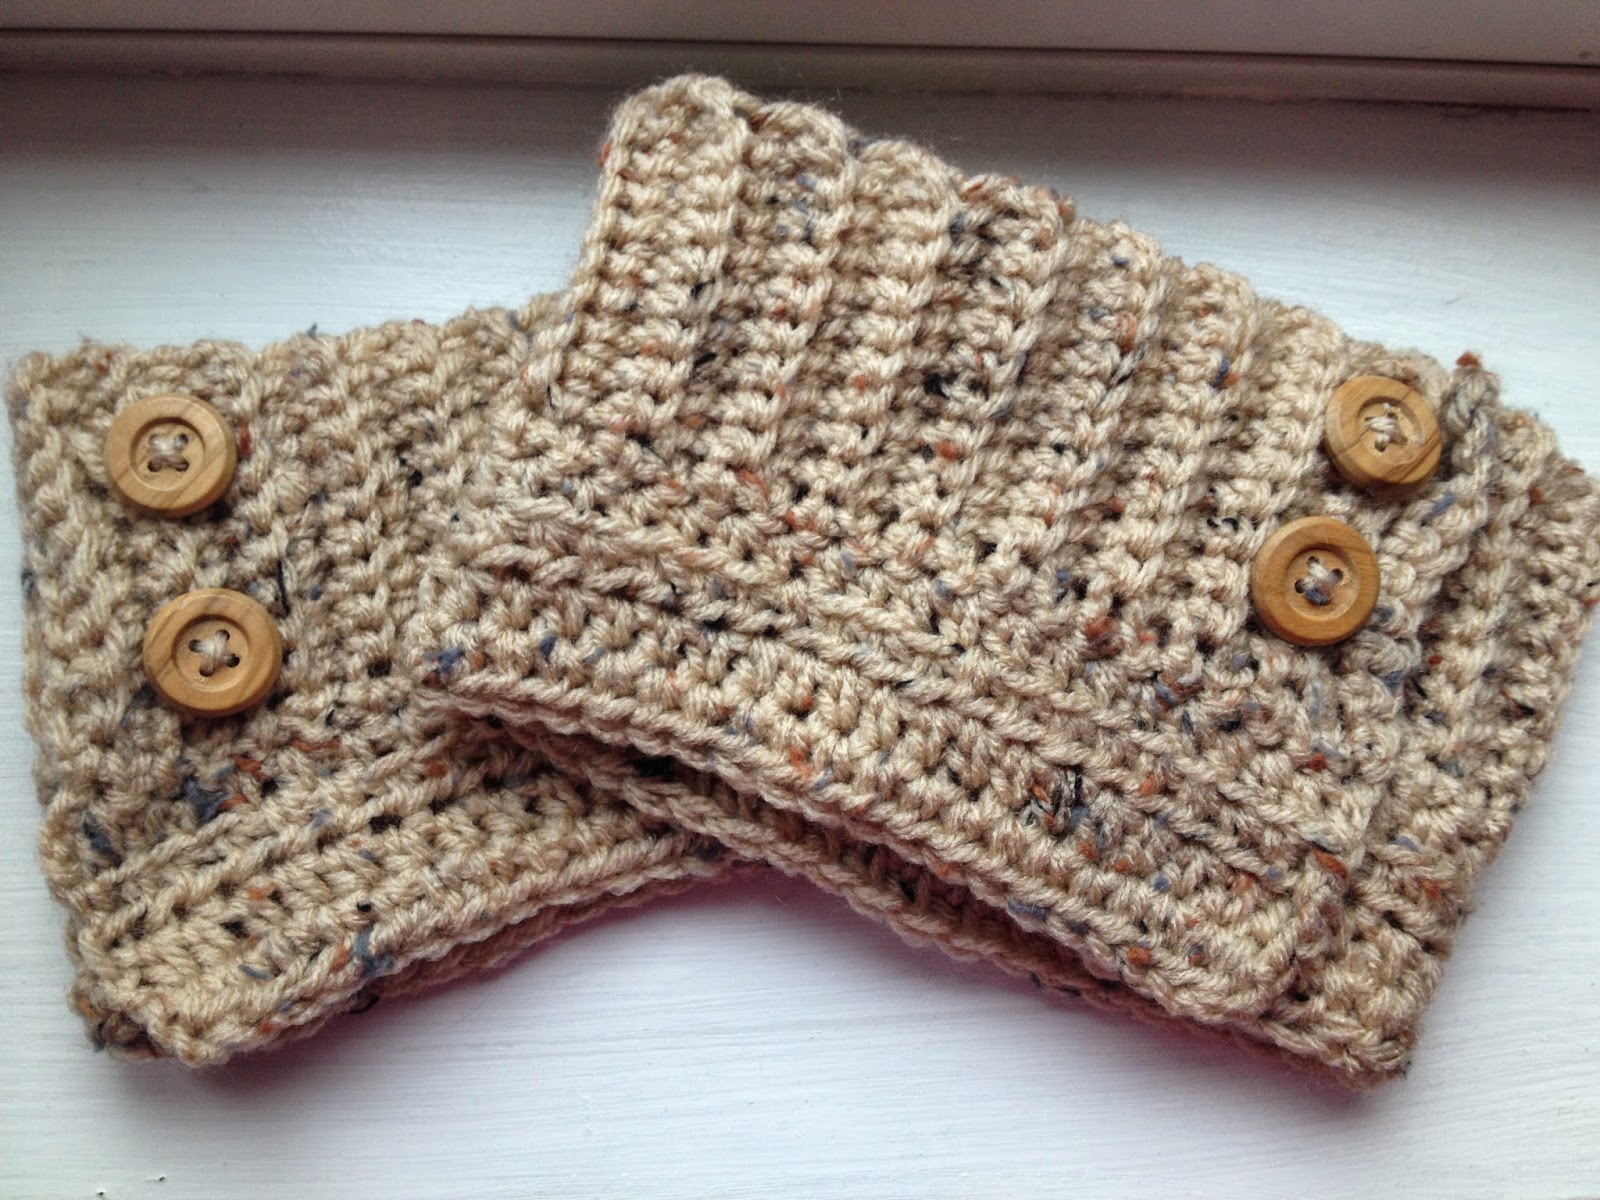
FREE: Crocheted Adjustable Boot Cuffs Pattern


Adjustable Boot Cuffs

Change the size of your boot cuffs as needed with this easy boot cuff pattern!
Boot cuff measures 16” x 5”

Stitch Abbreviations:
Ch – Chain
Sc – single crochet
Hdc – half double crochet
BLO – back loop only

What you need:
  • Red Heart Supersaver yarn for my boot cuffs or worsted weight yarn (you don’t want your boot cuffs to be too thick where they don’t fit inside your boot!)
  • Hook size H
  • 4 -  1/4” buttons for the inside of your boot cuffs to make them adjustable 
  • 4 buttons to embellish boot cuffs (optional)

Instructions:
Ribbing (the top):
Chain 11
Row 1: sc in second chain from hook and rest of ch (10 stitches)
Row 2-52: turn, ch. 1, sc in BLO across (10 stitches)

**I crochet until mine are about 15-16” long, but you can choose your length**

Now you are going to crochet the bottom part of the boot cuff.  Turn your work 90 degrees clockwise. You will be working along your crocheted rows.

Bottom of Cuff:
Row 1: sc, one in each row (in my case 52 sc)
Row 2-5: turn, ch. 2, hdc in each stitch across (52 stitches)
Finish off. 
Add 2 ¼” buttons to the inside of each boot cuff along the edge (as shown below)

Add 2 buttons to the outside of boot cuff along the edge of the ribbing (just opposite of the ¼” buttons)

**Make sure you make the boot cuffs opposite each other so that they aren’t buttoning in the same direction (I almost made that mistake!!)

Happy crocheting! Please let me know if you have any questions or need help with a part of this pattern!


**Please feel free to sell your finished products from this pattern! I would appreciate it if you can include a link to this pattern.**

Chicken Parmesan Bake


We were trying to think of something different for dinner that we haven't made in awhile and remembered this chicken parm bake that a friend told me about. Now it doesn't taste exactly like chicken parm (which is some fried goodness!), but it is a healthier option with some of the same flavors.  So simple, even my hubby was able to make it! :) 

What you need: 
  • 4 boneless, skinless chicken breasts
  • sauce, about a quart of whatever you prefer
  • shredded mozzarella 
  • croutons - I make homemade whole wheat croutons for a healthier option a couple days before for ease.  
In a 9x13" pan, layer the following: sauce, chicken, sauce, shredded cheese, croutons.  Cover with foil and place in the oven! 

Bake at 425 degrees for 30-35 minutes (until chicken is cooked). 

Halfway through, take off the foil to make sure the tops of those croutons stay crispy.  Enjoy! :) 

Do you have any favorite chicken dishes that are quick and easy!? I would love to hear about (and make) them! 


Thursday, September 18, 2014

Omelettes... for dinner!!


Sweet Potato, Spinach, & Feta Omelette!! 

You know those nights when you are just not in the mood for the dinner you planned??? You think you have everything figured out and all of a sudden you think it sounds crappy.  That's what happened tonight. I was just not in the mood for baked fish.  Blah.  So... I decided to have some breakfast for dinner! My absolute favorite!

Mmmm...omelettes!!

This time, I decided to put a little twist than what I normally do for omelettes (cheese and spinach) and decided to add...sweet potatoes!

I'm not sure if this is normal for some people, but it was actually pretty delicious! I had previously diced and froze sweet potatoes when we wouldn't eat them before they went bad.  So I took a handful of sweet potatoes and sauteed them on the stove until they were golden brown and soft on the inside.
 Then I added the spinach.  Once that was cooked a bit, I took those off the unit, cooked my egg, then added my sweet potato, spinach and added feta cheese.


Fold your omelette in half, cook some more and enjoy!

Delicious!!! What crazy things do you put in your omelettes?? I would love some more ideas!!