Sunday, September 28, 2014

Chili in Whole Wheat Bread Bowls...Yumm!!!


Fall Fun!! Football Fun!! It's the season of warm stews, soups and chilis! My favorite! I've been trying to make healthier options for meals, but you'll see some not so healthy options in there (like buffalo wings!) Today my hubby's favorite football team was actually being televised so I made some homemade buffalo chicken wings and chili in whole wheat bread bowls! The chili in bread bowls were pretty healthy so that counteracts the wings right?!?!!  Either way....Soooo delicious!

Now on to the recipes! :)


Whole Wheat and Oat Bread
Makes 2 9"x5" loaves or 3-4 grapefruit sized bread bowls

What you need: 
  • 1/4 c. warm water
  • 3 tbs. unsweetened applesauce
  • 1- 4 oz. package active dry yeast
  • 1/4 c. molasses
  • 1/4 c. honey
  • 1 1/2 tbs lemon juice
  • 1/3 c. melted coconut oil
  • 2 eggs, beaten
  • 1/2 c. oats
  • 1/2 c. ground flaxseed
  • 3 1/2 - 4 c. whole wheat flour
  • 1/2 c. warm water
Mix 1/4 c. warm water, applesauce and yeast packet in large bowl.  Let sit until foamy and doubles in size, about 5 minutes.  Next, mix molasses, honey, lemon juice, coconut oil and eggs into yeast mixture.  Add oats, flaxseed and 3 1/2 cups flour.  Stir in 1/2 c. water and more flour as needed to make a dough. Need your dough until mixed thoroughly, but be careful not to overmix! 

Lightly oil a bowl, cover and let it rise in a warm place for about an hour.  It should almost double in size.  Punch down, knead with a little extra flour (if needed) and separate into loaves, or in my case, bread bowls! If making bread bowls, use lightly oiled glass bowls you have to bake the bread in (I use my Pampered Chef Glass Batter Bowl ). I kept my dough too round so it was more like a ball; you will want to flatten is slightly to have more of that "bowl" effect.  Let the dough rise one more time for about an hour. 

Mist dough with water and bake at 375 degrees for approximately 35-45 minutes.  


While your bread is rising the second time, you can put together your chili.  Here is my very simple but tasty recipe.  I usually season to taste so my spices are "guesstimates". 

Simple Chili

What you need:
  • 1 lb. ground turkey, browned
  • 2 cans stewed tomatoes
  • 1 can dark red kidney beans, drained and rinsed
  • 1 jalapeno pepper or banana peppers depending on what you want for spice, diced
  • 1 tsp garlic powder
  • 1 tbsp. chili powder
Brown ground turkey and drain, Add ground turkey, stewed tomatoes and kidney beans in a saucepan with diced jalapeno, garlic powder and chili powder to taste.  Simmer for at least 30-60 minutes.  


Bread Bowl Assembly

Cut open your bread bowls, pour in your chili, and top with some shredded cheese.  Enjoy! :)


Thursday, September 25, 2014

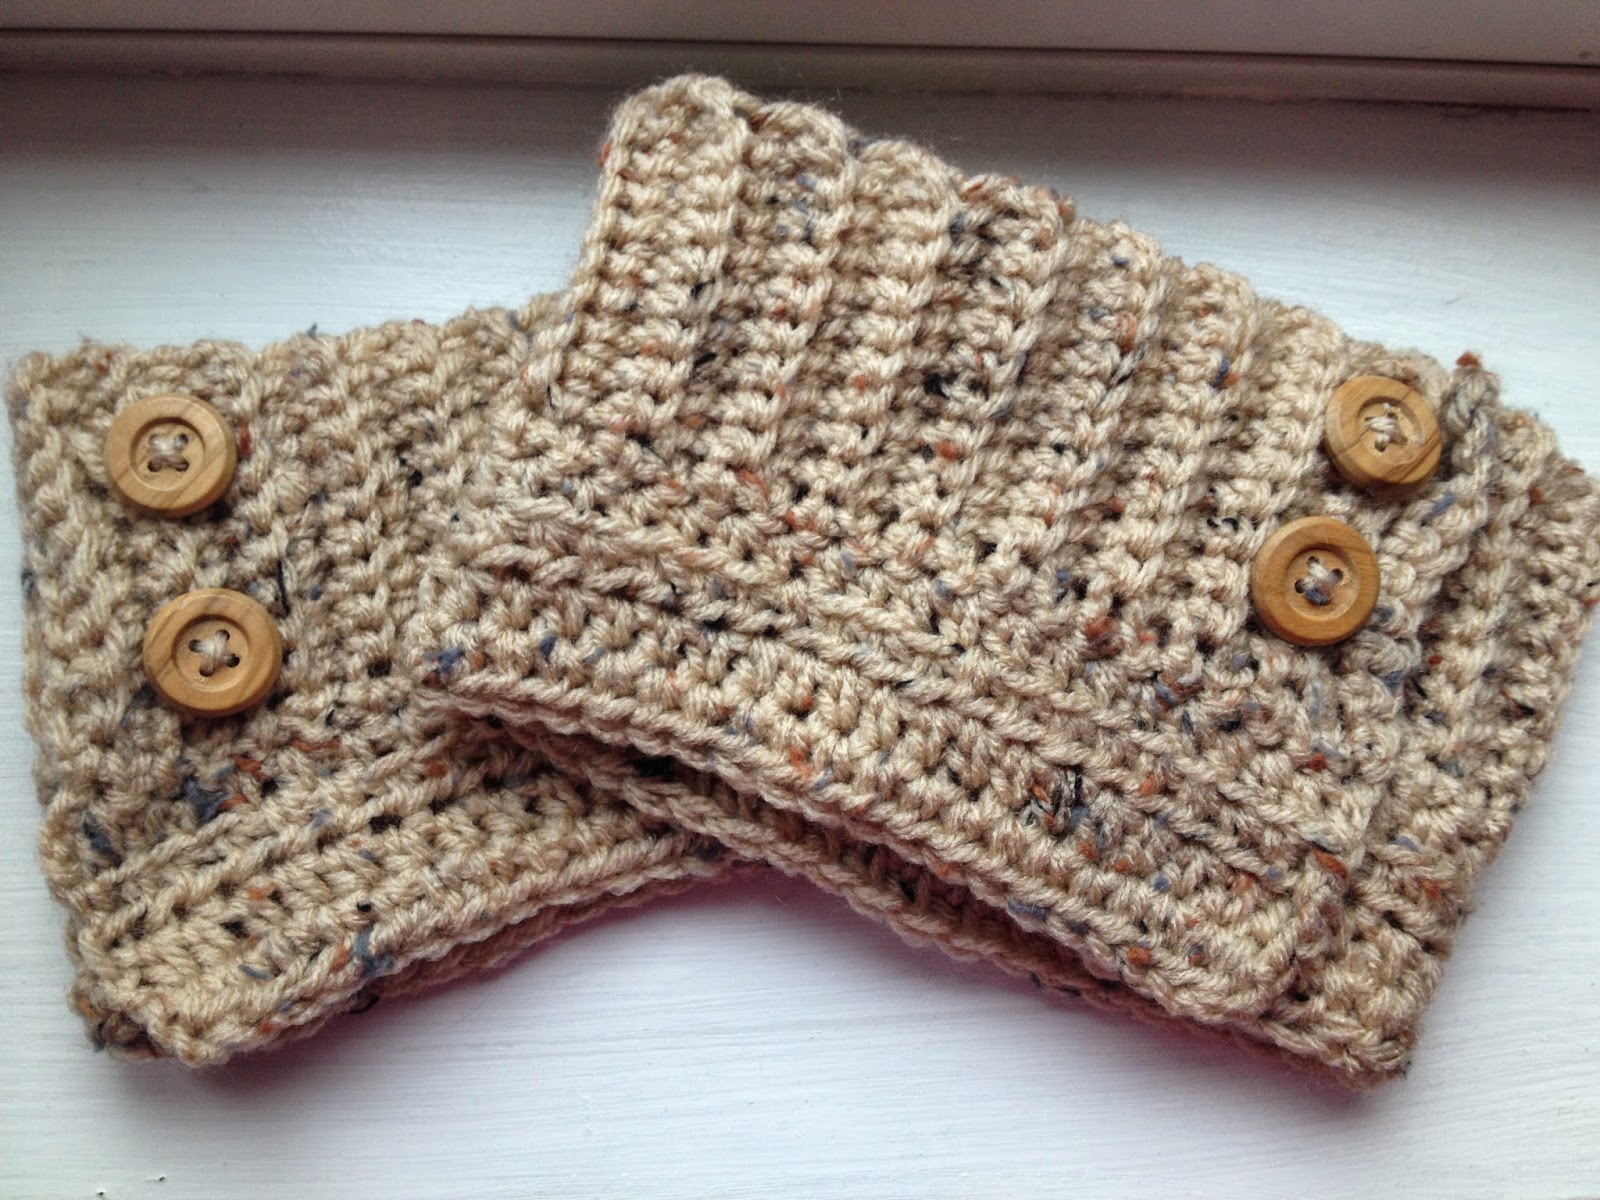
FREE: Crocheted Adjustable Boot Cuffs Pattern


Adjustable Boot Cuffs

Change the size of your boot cuffs as needed with this easy boot cuff pattern!
Boot cuff measures 16” x 5”

Stitch Abbreviations:
Ch – Chain
Sc – single crochet
Hdc – half double crochet
BLO – back loop only

What you need:
  • Red Heart Supersaver yarn for my boot cuffs or worsted weight yarn (you don’t want your boot cuffs to be too thick where they don’t fit inside your boot!)
  • Hook size H
  • 4 -  1/4” buttons for the inside of your boot cuffs to make them adjustable 
  • 4 buttons to embellish boot cuffs (optional)

Instructions:
Ribbing (the top):
Chain 11
Row 1: sc in second chain from hook and rest of ch (10 stitches)
Row 2-52: turn, ch. 1, sc in BLO across (10 stitches)

**I crochet until mine are about 15-16” long, but you can choose your length**

Now you are going to crochet the bottom part of the boot cuff.  Turn your work 90 degrees clockwise. You will be working along your crocheted rows.

Bottom of Cuff:
Row 1: sc, one in each row (in my case 52 sc)
Row 2-5: turn, ch. 2, hdc in each stitch across (52 stitches)
Finish off. 
Add 2 ¼” buttons to the inside of each boot cuff along the edge (as shown below)

Add 2 buttons to the outside of boot cuff along the edge of the ribbing (just opposite of the ¼” buttons)

**Make sure you make the boot cuffs opposite each other so that they aren’t buttoning in the same direction (I almost made that mistake!!)

Happy crocheting! Please let me know if you have any questions or need help with a part of this pattern!


**Please feel free to sell your finished products from this pattern! I would appreciate it if you can include a link to this pattern.**

Chicken Parmesan Bake


We were trying to think of something different for dinner that we haven't made in awhile and remembered this chicken parm bake that a friend told me about. Now it doesn't taste exactly like chicken parm (which is some fried goodness!), but it is a healthier option with some of the same flavors.  So simple, even my hubby was able to make it! :) 

What you need: 
  • 4 boneless, skinless chicken breasts
  • sauce, about a quart of whatever you prefer
  • shredded mozzarella 
  • croutons - I make homemade whole wheat croutons for a healthier option a couple days before for ease.  
In a 9x13" pan, layer the following: sauce, chicken, sauce, shredded cheese, croutons.  Cover with foil and place in the oven! 

Bake at 425 degrees for 30-35 minutes (until chicken is cooked). 

Halfway through, take off the foil to make sure the tops of those croutons stay crispy.  Enjoy! :) 

Do you have any favorite chicken dishes that are quick and easy!? I would love to hear about (and make) them! 


Thursday, September 18, 2014

Omelettes... for dinner!!


Sweet Potato, Spinach, & Feta Omelette!! 

You know those nights when you are just not in the mood for the dinner you planned??? You think you have everything figured out and all of a sudden you think it sounds crappy.  That's what happened tonight. I was just not in the mood for baked fish.  Blah.  So... I decided to have some breakfast for dinner! My absolute favorite!

Mmmm...omelettes!!

This time, I decided to put a little twist than what I normally do for omelettes (cheese and spinach) and decided to add...sweet potatoes!

I'm not sure if this is normal for some people, but it was actually pretty delicious! I had previously diced and froze sweet potatoes when we wouldn't eat them before they went bad.  So I took a handful of sweet potatoes and sauteed them on the stove until they were golden brown and soft on the inside.
 Then I added the spinach.  Once that was cooked a bit, I took those off the unit, cooked my egg, then added my sweet potato, spinach and added feta cheese.


Fold your omelette in half, cook some more and enjoy!

Delicious!!! What crazy things do you put in your omelettes?? I would love some more ideas!!


Monday, September 8, 2014

Football Time! Football Cake Tutorial


One of my favorite things to do is make/decorate cakes. We were heading to a football party so I decided to make a football cake (chocolate cake with peanut butter frosting covered in ganache). Wilton makes a football pan, but I don't have one. So here is a tutorial on how to make a football cake without the pan! Enjoy!

What you will need:
- One rectangle cake - I used a glass Pyrex that was smaller than a 9x13 - maybe a 9x6?? Does that exist??
** You can use a 9 x 13 pan, you will just cut your football template a little smaller so you have extra to piece together the top**
- 2 cupcakes or a smaller cake (if using a smaller pan - you will have extra cake batter, so I made cupcakes)
- frosting (any color for the football and green for the grass)
- chocolate ganache
- white frosting, candy clay, or fondant for laces on football


*I used a homemade cake batter so it definitely makes more than a box of cake, however, you should be good with just one boxed mix.  My cake batter made this cake and 12 cupcakes.


1. Once you bake and cool your cakes,  you are going to make a football template. I cut the cardboard  cake board to the size of my cake, then drew the football.  Trim as needed and check it on your cake.  


2.  Cut your cake out, save the corners because you are going to use them for the top layer! 


 Below are all my pieces deconstructed.  I used my cardboard template as my cake board.


This is them together (I played around for awhile to get what I thought was the best ratio.) If you are using a 9x13 pan, cut your football template a little smaller than the pan, then you should have enough leftover pieces to put together for your second layer.    

3.  Add frosting to the top of your bottom later and place your second layer of pieces on top.  Now some of you are wondering why I didn't make a second rectangle cake, and this happened for a few reasons.  First, I thought my cake would have rose more to have the "rounded" football effect on the top.  Second, if I put a second rectangle on top, I know my football would have ended up boxy or uneven. I'm still working on my carving skills, so the rounded pieces of cake helped me to achieve the roundedness (that's a word right??) of my football! 

The only thing I really "carved" was making the football shape for the bottom layer and I cut down the corners so they came to a point. 


4.  Now its time to frost it! Fill in all those extra spaces. Who doesn't love TONS of frosting?!? Especially peanut butter in my case! 


 Look at this hot mess!!!! Throw it in the fridge for 15 minutes.


Add more frosting and smooth it out. 

5.  Press the cake with a paper town to smooth out the lights and add texture like a football.


6. Place the cake in the fridge while you make and cool the ganache.  

7.  When the ganache is cool, but still pourable, take the cake out and place it on a cooling rack. Place the cooling rack on a foil covered cookie sheet or tray.  This will make clean up from the ganache nice and easy! 

8. Pour ganache over the cake starting in the middle and slowly making bigger circles. 


Let the ganache drip off for a little while.  

9.  Once the ganache stops dripping, transfer your cake onto your serving dish. The ganache will still be VERY gooey.

 10.  Roll out your fondant/candy clay and cut two long strips. Carefully place them on the cake (You may get chocolate all over them like I did if you're hands are bit shaky, just take your time!)  Then cut one skinnier stripe for the middle and little slices for the laces.

As you can see, the bottom of my cake isn't perfect.

11.  This is where borders come into play.  Using green frosting and the grass (Wilton tip# 233) and pipe straight up in short squeezes to make the grass standing up.  Voila! You're cake is finished!

Let me know if you have any questions!

Happy Creating and Baking!

Thursday, September 4, 2014

30 minute workouts..fit in that workout!


I have made a commitment, using this blog as my motivator, to work out 4 times a week.  This is week one...and I'm already struggling. It is now Thursday and I am only working out for the second time this week.  That means I will have to work out tomorrow and Saturday to get my 4 times in.  I feel like I have been making working out a job, instead of just enjoying what I love.

My goal was to workout 4 times per week, at least 30 minutes. So 30 minutes is what I did tonight.  I was engrossed in the TV. (yup one of those nights) and just didn't "feel like working out" (said in a whiny voice).  However, being able to workout while watching TV at home was amazing!

I used the Workout Trainer App by Skimble https://www.skimble.com/workouts  (it's available on the App Store and Google Play).  It has a free and paid version. I use the free version.  There is an abundance of different workouts ranging from 2-minute planks to 30 minute, 60 minutes+ workouts.  I've used the kickboxing, abs, yoga, and HIIT workouts on the app in the past.  Tonight I decided to try a Pilates workout, which was pretty good.  There were a few long rest breaks, but I used some of them to incorporate some abs and additional planks.  My only problem was my 170 pound dog trying to sit on my during the workout, but that has nothing to do with the app! At least it was a cute pain in the butt! I definitely think the app is worth checking out! 

Who can get mad when seeing this face interrupt your workout?! 

He reminded me of the Huffington Post video with Pets Interrupting!!

Here are few other apps that also have trainings/workouts you can do, but I haven't tried them to know what they are like: 
  • Daily Burn App (free lite version)
  • FitStar Personal trainer App (free lite version)
  • Yoga Studio App ($3.99)
  • Gain Fitness (free lite version)
  • JeFit Workout
In addition, I thought it would be nice to outline some 30 minute workouts that don't seem as "hard" but still give you a good workout! 

Harvard Medical School posted an article called "Calories burned in 30 minutes for people of 3 different weights".  Here is the article for all the information/activities, it even includes some professions! http://www.health.harvard.edu/newsweek/Calories-burned-in-30-minutes-of-leisure-and-routine-activities.htm

Here are few examples based on a 125 pound person: 

  • Weight Lifting: 90 calories (general) vs. 180 (vigorous)
  • Running at 6 mph: 300 calories
  • Low Impact Aerobics: 165 calories
  • Circuit training: 240 calories
  • Dancing (slow, waltz, fox trot): 90 calories  <--I watched Dirty Dancing tonight so I'm all for this!!! 
  • Golf: 165 calories
  • Bowling: 90 calories
  • Swimming, general: 180 calories

OK, so some of these activities may seem like work to you, but there are so many things that you can do to incorporate into your workout to make it less boring! Here are some other workouts that may peak your interest if you want some routines to switch it up. 


I hope this gave you some ideas on how to switch up or add to your routine! 


**Disclaimer: I am NOT a professional trainer or by any means claim to be.  This article is based on my own personal experiences and what I find to help continue to motivate me.  Please speak to a medical professional to see what workouts are appropriate for you. **


Resources: 

Monday, September 1, 2014

I did it!!! Dyeing 100% Polyester Chiffon Fabric!!!


So I have this beautiful wedding dress from 3 years ago that has been sitting in the closet untouched, unlooked at... So...I wanted to do something different. As you can see from the pictures, it's not really a dress you can just dye and wear it out.


You like the dead plant in the middle picture?! haha I don't have the greenest of thumbs! 
The embroidery and beading make it a little too fancy for your typical wear.  That's why I decided to cut (gasp!), dye (gasp!), and recreate my wedding dress into a cocktail dress!!! Yay!!! 

Cutting up my wedding dress! 
I slowly seam ripped all the threading for the beading and flowers. 


I made sure to measure out the amount of chiffon I had to ensure the pattern I picked would use what I had and not need much more. Some patterns I looked at needed about 5 yards! I only had about 2.  

Dyeing: 
Of course my dress was 100% polyester, which is such a "no-no" for dyeing.  I tried reading as much as I could about how to attempt to do this with RIT dye (since I didn't feel like waiting for the polyester dye to ship and come in) and since I'm really bad of following instructions! 


Well, everything says NOT to do this...hmm... Yup I'm going to try it! Now I don't recommend this unless this is an item a) you don't care about (which I love my dress, but I know I'll never wear it again) and b) you'll never wear it the way it is.  The smart thing to do is buy the dye meant for your fabric type, but here is how I went about dyeing my dress the WRONG way).  


I gathered all of my supplies: 
- Liquid RIT dye in Aquamarine
- Rubber gloves
- Stockpot
- 1 cup vinegar
- glass bowl to put dyed clothes/fabric in to transfer to sink
- 1 tbsp. laundry detergent
- Something to stir your brew with (I used a paint stick)


1. I boiled the water first then added in the whole bottle of dye (doubled the intensity for the 1 gallon water because I knew it wasn't going to dye as easily). 

2.  Say a little prayer/rain dance or whatever will help you to make this work and put in your fabric (ahhh!!!!).   

3.  Set the time for 5 minutes and stir away. It's a great way to get an arm workout! 

4.  When the timer goes off, pour in the vinegar and laundry detergent.  

5. Set the time for at least 25 more minutes and stir constantly.  I left the stove on so the water continued to stay hot while I was dyeing the fabric.  When I would pull up the fabric it didn't appear like it worked. I was disappointed, but figured I could just try with poly dye...

6.  When you feel that you have reached the dye intensity you want, transfer clothes to the sink and rinse first with warm water, then with cold water.  

7.  When the water runs clear, wash your clothes in the washing machine (yes I still did this even though everyone said the dye will just wash out!)

8. Hang to dry and here is what I got! 

In the picture it looks a lot lighter, but it is a sky blue color. It's not the color I was looking for but I'm hoping that when I get the lining for the dress, I can alter the color a little bit.  If not, I'll try dyeing it again.  

Some things I would have done differently: 
- I would have added in more dye (probably a green color to make it more teal)
- I would have dyed it for longer. Who knows if it would have gotten any darker, but I did the bare minimum because I really thought it wasn't working. 


Like I said, I don't recommend you doing this on any item, make sure it's something you don't care about or try to test it on similar material. Polyester is really finicky.  The threading in a tank top I threw in the pot didn't dye at all, but the cotton tank top did, so it really depends on the material.  


Now to turn this fabric into this!!

Let me know if you have any questions!! I can't wait to share my final product with you!