Showing posts with label create. Show all posts

Thursday, January 1, 2015

Happy New Year!! What's your New Year's Resolution??

Happy New Year!!!  I look forward to building my blog and providing you with different tips, tricks, recipes, and projects that hopefully will inspire you! I think that last year was a good start and I can't wait to ramp it up!

 Looking back at 2014, it was a pretty eventful year, but I can't say that I stuck to my resolutions very well.  I always go for your typical eat better, exercise more, blah blah blah. This year, I've decided to switch things up.  Instead of getting rid of things, I'm going to ADD. Add more family and friend time, add paying it forward tasks, and add positive focus.

It is SO easy for me (and probably many of you) to see the negative.  I want to try and find that silver lining in things.  I want this year to be about letting others know how much they mean to me and how they impact my life.  I want to help others the best I can, and I want to make sure I carve out quality time with loved ones.  So often we "talk" about what we want to do, but when it comes to actually doing it, we don't follow through.  This year WILL be different!!! Who's with me?!

So here are my thoughts for the year.   

1.  Family/friend time
- at least one dinner per month with family and/or friends.  We are always together in large masses where it's so hard to have a quality conversation with anyone.  This will give us that opportunity! 

2.  Pay it forward
- I'm still figuring this one out, but there are so many things that I can do to make it an impact.  Sometimes even just a smile at someone makes a huge difference! 
- Register for races that donate to charity.  I register for 3-5 races a year.  This year, I want to make sure that the races raising funds and awareness for a charity.  

3. Positive focus
- This isn't a set activity thing per se, but hopefully will be built in my mind set for the new year.  Spending quality time with loved ones and doing things I love, would definitely build my positive focus.

I can't wait to share projects and tips throughout the year that will help us show our love and passion! 

"So often we become so focused on the finish line that we fail to enjoy the journey." - Dieter F. Uchtdorf


What's your New Year's resolution?! I would love to hear from you!! 

Wednesday, December 31, 2014

Ooh la la! DIY Gold Chandelier


Ever see all those fancy decorations and then when trying to find it, you can never find what you are looking for?  Ya, that's me...always...I have these insane ideas for DIY projects and decorations and sometimes the ambition to complete them.  Luckily, I have a crazy enough family that is willing to humor me and be ambitious with me!

So this is where the golden chandelier was created, inspired by the Great Gatsby for a Roaring 20's themed party.  When trying to find one to buy, they were all too small and would get lost in the size of the room so we created two! 

What you need (this will make 2): 
  • 1- 12' fringe curtain such as this one or you can use 2-fringe table skirts (just make sure the length is what you are looking for as well as long enough to cover your hula hoop!)
  • 2 hula hoops (the size you would like your chandeliers to be)
  • spray paint similar to the color of your fringe curtain 
  • packing tape/masking tape
  • thin string/fishing line
  • hot glue gun
  • scissors
  • a large area to lay out the curtain on
  • 2 people! This will definitely make this a lot easier

  1. Spray paint your hula hoops. You only need to spray paint the side that is facing down, but can do both sides if you'd prefer.  
  2. If you are using table skirts, skip to step 6.  Lay out the curtain on the floor. You will want it as flat as possible with as few strands overlapping as possible.  This will make the next step easier. 
  3. Using your second person, pull a piece of packing tape that is the width of your curtain (12 feet) and half way down the length of the curtain (4 feet).  The metallic fringe was full of static so we placed the tape down on both sides at the same time, then pushed the fringe to the tape.
  4. Next, cut along the TOP part of the taped area along the width of the curtain (12 feet).  You have now made 2 long strips of fringed curtain that are 4 feet long.  
  5. Flip the curtain over and put another strip in the same spot as the tape on the other side.  
  6. Take one strip and hot glue it to the hula hoop. Hot glue small amounts at a time so the glue doesn't dry before you are able to get the curtain attached.  Be careful, it gets hot!!!
  7. Once your hula hoop has fringe all around, cut the excess off.
  8. Repeat steps 6 & 7 for your second hula hoop.  
  9. Attach 3 pieces of string to the hula hoop and loop together.  Hang using string or fishing line.  I hung this on a fan, but you can hang from anywhere on a ceiling.  Command hooks work great! 
  10. Trim any crooked fringe or if it is hanging too low.  
  11. Voila! You have yourself two chandeliers!
Additional Thoughts: If you have the time, you can also make a second smaller hula hoop fringe to hang underneath it to add depth.  We ran out of time, but it could have been a nice touch.  

Here is a picture tutorial to help with these directions! Good luck! :) 

1. Spray paint your hula hoops. You only need to spray paint the side that is facing down, but can do both sides if you'd prefer.  


2.  If you are using table skirts, skip to step 6.  Lay out the curtain on the floor. You will want it as flat as possible with as few strands overlapping as possible.  This will make the next step easier.

3. Using your second person, pull a piece of packing tape that is the width of your curtain (12 feet) and half way down the length of the curtain (4 feet).  The metallic fringe was full of static so we placed the tape down on both sides at the same time, then pushed the fringe to the tape.


4. Next, cut along the TOP part of the taped area along the width of the curtain (12 feet).  You have now made 2 long strips of fringed curtain that are 4 feet long.  


5.  Flip the curtain over and put another strip in the same spot as the tape on the other side. 

 
6. Take one strip and hot glue it to the hula hoop, wrapping it around the top of the hula hoop. Hot glue small amounts at a time so the glue doesn't dry before you are able to get the curtain attached.  Be careful, it gets hot!!!

7. Once your hula hoop has fringe all around, cut the excess off.

8.  Repeat steps 6 & 7 for your second hula hoop.
9,  Attach 3 pieces of string to the hula hoop and loop together.  Hang using string or fishing line.  I hung this on a fan, but you can hang from anywhere on a ceiling.  Command hooks work great! 

10,  Trim any crooked fringe or if it is hanging too low.  


Voila! You have yourself two chandeliers!

Sunday, December 7, 2014

Roaring 20's Party Ideas and Decorations


Leaving the Roaring 20's Behind Party was a hit! We transformed a hall into an awesome Gatsby-inspired themed party.  Starting from scratch, we were able to create a complete look!

Before

After! With decorations from 1toystore.com and 4funparties.com, we were able to decorate the room really well! 


The chandeliers in the center of the room are made from gold fringe curtain and a hula hoop painted gold.  Here is the tutorial for the chandelier!


Here were some additional features of the party! I hope you are inspired from all these fun ideas!
A two tiered cake with fabric embellishments make for a fun, easy cake! 


Many of our favorite candies were invented in the 20s!! My sister put together this amazing candy bar with a timeline and descriptions of when the company started making the candies. It was a perfect Thank you goody bag! Who says goody bags are for kids?!?!
It was AWESOME! 

 Above the candy bar hung a Happy Birthday sign created using my Cricut. 

Centerpieces were made with spray painted branches (it was perfect that this party was in the winter!) and spray painted vases from the dollar store).  Hanging a string of pearls added the perfect touch to this centerpiece! 


I also made a photo booth using the program Sparkbooth ($55) that I had purchased when planning my husbands party last year. Last time, we made the space too small so the pictures were EXTREMELY dark.  This year, my party planner assistant (aka my mom) came up with the idea to use the frame from a canopy tent.  It was a 10' frame that we taped black table cloths to to create the photobooth effect.  (I ran out of black tablecloths - since I used some for the backdrop as well.  You will need 2 for each side if you are going to cover all sides.  

Photo props included mustaches, glasses, lips, boas, hats, saxophones, microphones and cigarettes.  We had a blast! 
I set up the photobooth to automatically print and it came out with 2 copies of the picture per page.  They were able to tape one into a book, giving me a keepsake of my 30th and the others was there to keep! 


Wednesday, November 19, 2014

30th Birthday Party - Leaving the Roaring 20s Behind Theme - Invitations

My family is really big into throwing everyone in our family a surprise 30th birthday.  Well I'm the last of 4 girls, so I knew the surprise would be coming and asked if I could crash the party planning.  We came up with the theme "Leaving the Roaring 20s Behind", which I am so excited to dress up for! My family LOVES to party plan and I think we do a pretty damn good job! You can be the judge ;-)

Here are some of my beginning thoughts once you come up with your theme.

Pick a date and location
Finding a location can be super tricky..How much work do you want to put into planning? Do you want a caterer/wait staff available or do you want a hall and you do the work/provide the food/drinks/etc?  Do you want to rent a mansion?

I went back and forth with this. Yes, having a place that caters and takes care of linens, plates, silverware, and everything is AWESOME! So much less work, but there are some things you have to consider: does the place fit your theme? Are you willing to sacrifice some decorating that you wanted if you can't decorate the walls, don't have the space, or both? As much as I wanted a mansion, there is no way I was justifying that cost to my husband!

I really wanted to make my own photobooth for this party (which I did last year for my husband's 30th, so I think I worked out the kinks!) and knew that I was going to be limited with decorating based on the places I found.  I also am having a party in the heart of holiday party season, which makes it way more difficult to find a place.

Soo...that's why we went with a blank slate! A rectangle hall with a bar.  All food and drinks will have to be provided by us, but I can decorate however I WANT!!! Woohoo!!! To get an idea of how crazy I am, I want to decorate the entire room..... I mean covering wall to wall. Think Great Gatsby!

You can essentially turn any space in a theme-oriented space, it just takes some planning.  

Good thing my family loves me!! :-D


Invitations
Now I went through pinterest and etsy to find something I was interested in and found this:

http://www.pinterest.com/pin/435090013975007291/ 
I wanted to make my own invitations.  I used Microsoft Publisher because it is easier for me to drag the text boxes around, but you can also use Word or some other word processor.

The following site was a fabulous resource for different paid and free fonts you can use:
http://www.blogher.com/throwing-1920s-great-gatsby-party-menu-book 

Using the different fonts, I created this invite:


I printed it on ivory paper. On the bottom is a qr code that I created; when scanned, it brought them to a google doc for responses that would automatically be uploaded to my computer.  If you scan the code on my invite, you will see that it brings you to the site that I used to create the code.

Many more 20s themed posts will be coming soon as decorations are created and ordered as well as how to put together your own photo booth!

Thanks for looking!

Monday, October 13, 2014

Machine Embroidering on Crocheted Item: Success!


I bought a new sewing/embroidery machine two months ago and I haven't had too much time to play around with it.  My main thoughts behind getting the machine was to monogram towels.  In that process, I haven't found lettering that I really like for "S".  I think they all look like scribbles!

During the search for monogramming, my husband had this great idea to embroider on an ear warmer one of the races that we have completed.  So I ventured into crocheting an ear warmer for him that I was going to embroider "Gulf Beach 13.1" on, except, I made the headband too small.  It just fit me so perfectly though!! Perfect "mistake" right?! ;-)  That's when I decided to embroider "Roxbury 26.2" on it.  This marathon I completed last December in 15 degree, snowy weather.  It was such an awesome race that I signed up again!!! I want to make sure that I am nice and warm for this race and what better way than to show off the race name??

I've never embroidered on crochet and couldn't find much information about it so I treated it like it was a towel.  With towels, there is the concern that the needle will get caught on the material and pull, making it difficult to embroider.  That is when I found wonderful information on the web to use a water soluble stabilizer on top of the towel and a tear-away, or cut-away, stabilizer underneath.

I did the same thing with the crochet and it worked! Be careful not to pull your crochet too tight when putting it in the hoop, otherwise it will stretch and could pucker your work.

Happy crocheting and embroidering!! :)

Thursday, September 25, 2014

FREE: Crocheted Adjustable Boot Cuffs Pattern


Adjustable Boot Cuffs

Change the size of your boot cuffs as needed with this easy boot cuff pattern!
Boot cuff measures 16” x 5”

Stitch Abbreviations:
Ch – Chain
Sc – single crochet
Hdc – half double crochet
BLO – back loop only

What you need:
  • Red Heart Supersaver yarn for my boot cuffs or worsted weight yarn (you don’t want your boot cuffs to be too thick where they don’t fit inside your boot!)
  • Hook size H
  • 4 -  1/4” buttons for the inside of your boot cuffs to make them adjustable 
  • 4 buttons to embellish boot cuffs (optional)

Instructions:
Ribbing (the top):
Chain 11
Row 1: sc in second chain from hook and rest of ch (10 stitches)
Row 2-52: turn, ch. 1, sc in BLO across (10 stitches)

**I crochet until mine are about 15-16” long, but you can choose your length**

Now you are going to crochet the bottom part of the boot cuff.  Turn your work 90 degrees clockwise. You will be working along your crocheted rows.

Bottom of Cuff:
Row 1: sc, one in each row (in my case 52 sc)
Row 2-5: turn, ch. 2, hdc in each stitch across (52 stitches)
Finish off. 
Add 2 ¼” buttons to the inside of each boot cuff along the edge (as shown below)

Add 2 buttons to the outside of boot cuff along the edge of the ribbing (just opposite of the ¼” buttons)

**Make sure you make the boot cuffs opposite each other so that they aren’t buttoning in the same direction (I almost made that mistake!!)

Happy crocheting! Please let me know if you have any questions or need help with a part of this pattern!


**Please feel free to sell your finished products from this pattern! I would appreciate it if you can include a link to this pattern.**

Monday, September 8, 2014

Football Time! Football Cake Tutorial


One of my favorite things to do is make/decorate cakes. We were heading to a football party so I decided to make a football cake (chocolate cake with peanut butter frosting covered in ganache). Wilton makes a football pan, but I don't have one. So here is a tutorial on how to make a football cake without the pan! Enjoy!

What you will need:
- One rectangle cake - I used a glass Pyrex that was smaller than a 9x13 - maybe a 9x6?? Does that exist??
** You can use a 9 x 13 pan, you will just cut your football template a little smaller so you have extra to piece together the top**
- 2 cupcakes or a smaller cake (if using a smaller pan - you will have extra cake batter, so I made cupcakes)
- frosting (any color for the football and green for the grass)
- chocolate ganache
- white frosting, candy clay, or fondant for laces on football


*I used a homemade cake batter so it definitely makes more than a box of cake, however, you should be good with just one boxed mix.  My cake batter made this cake and 12 cupcakes.


1. Once you bake and cool your cakes,  you are going to make a football template. I cut the cardboard  cake board to the size of my cake, then drew the football.  Trim as needed and check it on your cake.  


2.  Cut your cake out, save the corners because you are going to use them for the top layer! 


 Below are all my pieces deconstructed.  I used my cardboard template as my cake board.


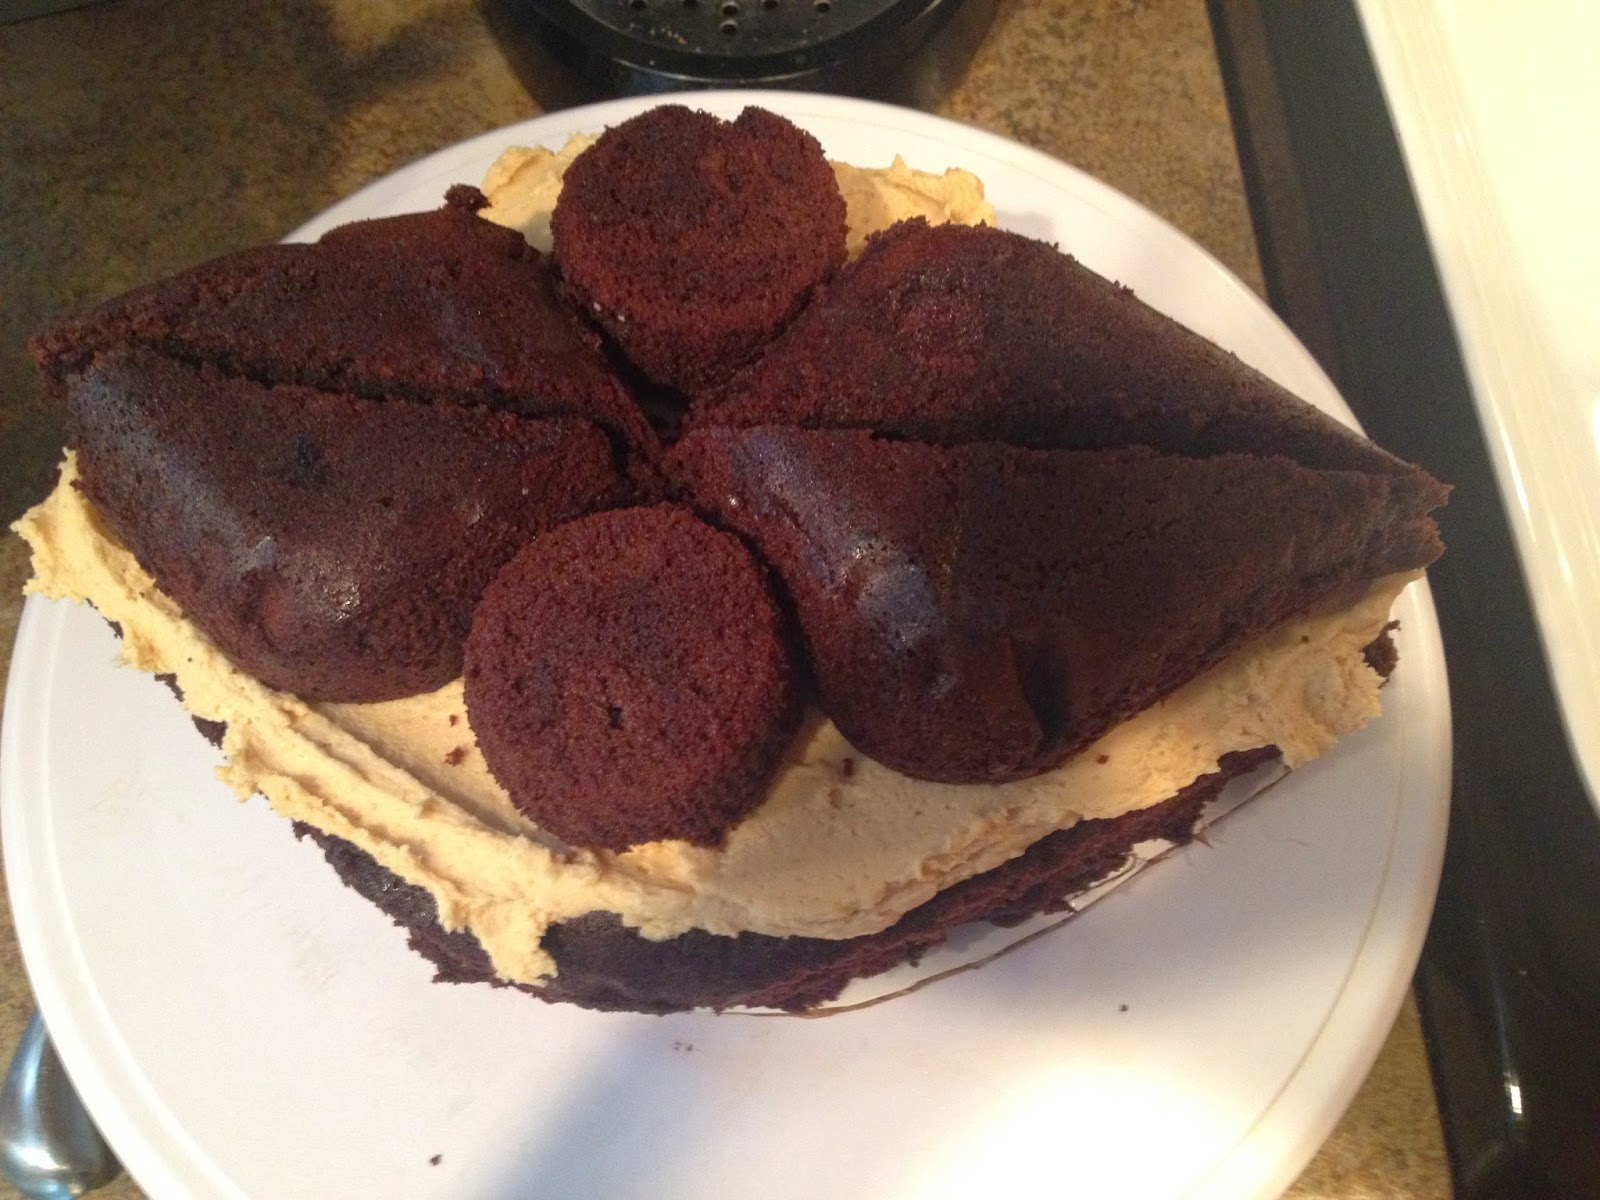
This is them together (I played around for awhile to get what I thought was the best ratio.) If you are using a 9x13 pan, cut your football template a little smaller than the pan, then you should have enough leftover pieces to put together for your second layer.    

3.  Add frosting to the top of your bottom later and place your second layer of pieces on top.  Now some of you are wondering why I didn't make a second rectangle cake, and this happened for a few reasons.  First, I thought my cake would have rose more to have the "rounded" football effect on the top.  Second, if I put a second rectangle on top, I know my football would have ended up boxy or uneven. I'm still working on my carving skills, so the rounded pieces of cake helped me to achieve the roundedness (that's a word right??) of my football! 

The only thing I really "carved" was making the football shape for the bottom layer and I cut down the corners so they came to a point. 


4.  Now its time to frost it! Fill in all those extra spaces. Who doesn't love TONS of frosting?!? Especially peanut butter in my case! 


 Look at this hot mess!!!! Throw it in the fridge for 15 minutes.


Add more frosting and smooth it out. 

5.  Press the cake with a paper town to smooth out the lights and add texture like a football.


6. Place the cake in the fridge while you make and cool the ganache.  

7.  When the ganache is cool, but still pourable, take the cake out and place it on a cooling rack. Place the cooling rack on a foil covered cookie sheet or tray.  This will make clean up from the ganache nice and easy! 

8. Pour ganache over the cake starting in the middle and slowly making bigger circles. 


Let the ganache drip off for a little while.  

9.  Once the ganache stops dripping, transfer your cake onto your serving dish. The ganache will still be VERY gooey.

 10.  Roll out your fondant/candy clay and cut two long strips. Carefully place them on the cake (You may get chocolate all over them like I did if you're hands are bit shaky, just take your time!)  Then cut one skinnier stripe for the middle and little slices for the laces.

As you can see, the bottom of my cake isn't perfect.

11.  This is where borders come into play.  Using green frosting and the grass (Wilton tip# 233) and pipe straight up in short squeezes to make the grass standing up.  Voila! You're cake is finished!

Let me know if you have any questions!

Happy Creating and Baking!